The crypto market is marked by high volatility, which presents traders with numerous opportunities for profit. However, this volatility is a double-edged sword, as it places the same traders at risk of loss if the market turns against them. The only way to profit from the markets is to scour them for prolonged periods in search of opportune trading setups determined by a viable trading strategy. This is often a tedious and time-consuming endeavor, which is why most traders prefer to utilize bots. Once you instruct the bot on a strategy to follow, it is capable of autonomously searching the markets for opportunities 24/7.
Nowadays, there are several platforms on which one can create a trading bot from scratch. On Bitsgap, you can even do so without writing a single line of code. The first thing we need to establish is our preferred trading strategy. The most popular strategy in crypto is called buying the dip. This involves purchasing a coin when after its price plummets in the hope of profiting from its future rallies. This strategy allows one to buy larger amounts of a cryptocurrency and yield bigger profits once the coin rallies. That being said, let’s break down the process of creating a buy the dip (BTD) bot.
Step I: Selecting the bot type
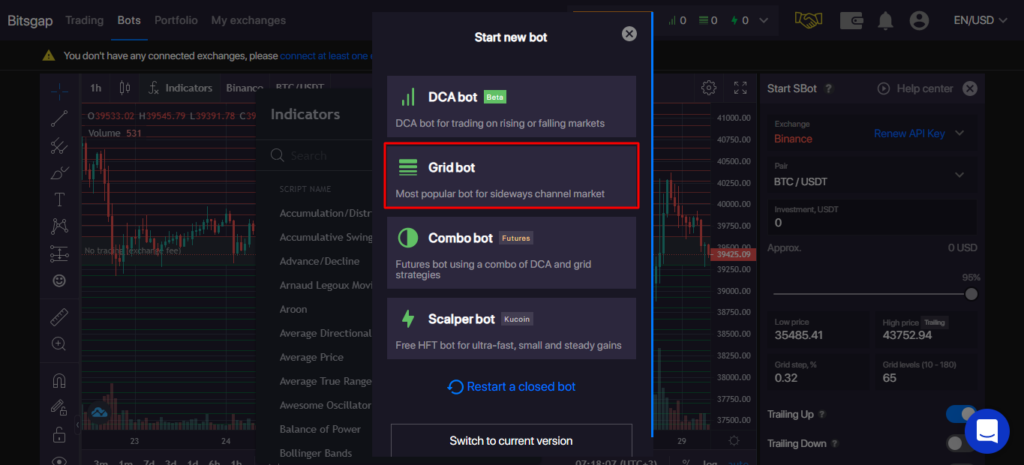
Once you sign up and log in to Bitsgap, it will redirect you to their landing page, which contains a bots option at the top right. Click this option, then click on the orange ‘Start new bot’ button that appears at the top of the page. This will open a drop-down menu listing all available bots one can create. From this list, choose the Grid bot.

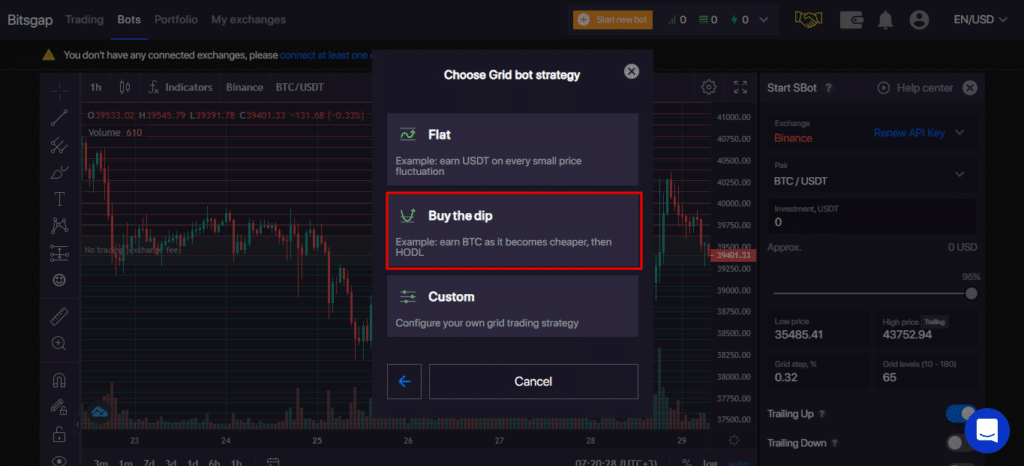
Clicking this will open a new pop-up menu with several grid bot types. From this list, choose the Buy the dip option.

Step II: Choosing the exchange and pair to trade
Once you select Buy the dip bot in the previous step, it opens a widget that lets you tweak the settings of your bot. First, you will need to choose an exchange from the long list of supported platforms. You will also need to choose a crypto pair to trade. For our intents and purposes, we’ll go with Binance and the BTCUSDT pair.
Step III: Choosing the investment value
Once we have the exchange and the pair we intend to trade, it is time to choose the principal we would like to work with.

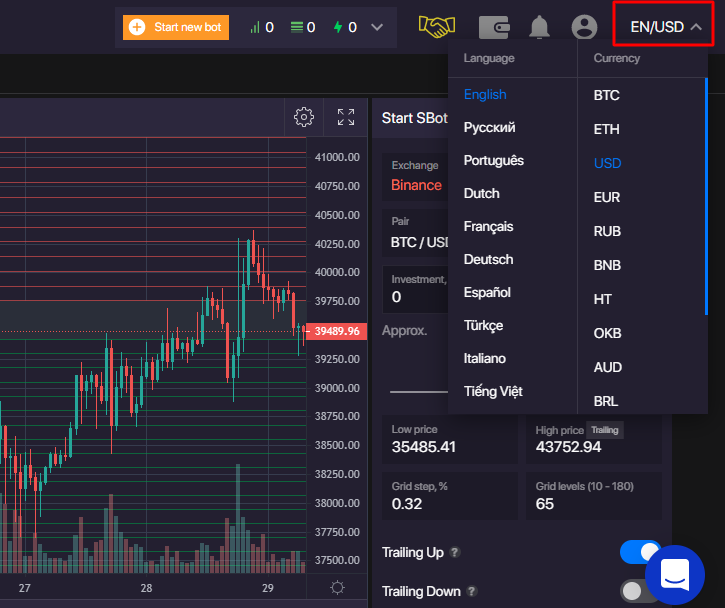
This value is denominated in the system currency, which can be changed using the drop-down button at the top right corner of the page. This is illustrated in the image above.
Step IV: Choosing your trading frequency
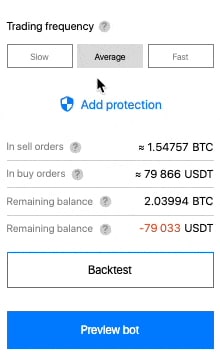
In this step, we choose how often the bot is going to enter trades. There are three options: slow, average, and fast. The slow option executes fewer trades, with a 3% grid step, but promises bigger returns from each trade. The average option places orders with a 1% grid step, with a moderate profit per trade. The fast option utilizes a 0.3% grid step, which makes for plenty of orders, but typically offers less profit from each trade.
Assuming this is your first bot, the safest option would be the average. Later on, depending on your results, you can reduce or increase the number of trades your bot makes.
Step V: Risk management
Though optional, you can add measures to protect yourself from further losses if the market turns against you or to lock in profits when substantial returns are made. This can be done by clicking on add protection, which opens a menu containing take profit and stop the bot.

For the take profit option, you specify a percentage profit at which you’re comfortable exiting the trade altogether. Once the current funds reach this amount, the bot closes all your open positions. It is then moved to the Spot History and assigned the Take Profit status.
For the stop bot option, you are prompted to specify a price below which the bot cancels your orders. The stop bot feature trails down with the price until it reaches your threshold, after which it closes all open positions. The bot is then moved to Spot History and assigned Stop loss status.
Step VI: Preview
Once you’re sure all your preferred settings are well selected, click on preview bot to create your trading bot. You can also backtest it to see how it would have fared in the past. However, the results of the backtest only go to show the profit potential of your bot, but they are not indicative of its future performance.
Additionally, during this step, there are several figures you should pay attention to. These are:
- In sell orders – This shows how much of your base currency you need to start making short trades with your bot.
- In buy orders – This shows how much of your quote currency you require to start making long trades with your bot.
- Remaining balance #1 – This is the amount of your base currency that’ll be left after starting your bot.
- Remaining balance #2 – This is the amount of quote currency that’ll remain after you start the bot.
Once all your settings are satisfactory, you can click on confirm button to launch your BTD bot.
Conclusion
The process of analyzing the markets in search of trading opportunities is often tedious and time-consuming. The crypto market runs 24 hours a day, seven days a week. It is practically impossible for a trader to pay attention throughout the trading day, which is why most of them prefer to use bots. The good news is that with platforms such as Bitsgap, you can create a personalized bot from scratch without writing a single line of code.


Leave a Reply