Most cryptocurrency traders aim to buy digital coins when their price plummets in the hopes of selling them once they rally. However, these markets are marked by extreme volatility and extreme unpredictability. This introduces extreme levels of risk, especially for investors who make large one-off trades. To reduce this risk, some investors opt to make small, regular trades in what is called the dollar-cost averaging (DCA) strategy. The good news is, on some platforms, such as Bitsgap, you can create a bot to automatically place your trades according to your specifications. Here’s a step-by-step guide on how to go about it.
Step 1: Choosing an exchange, cryptocurrency, and trade direction
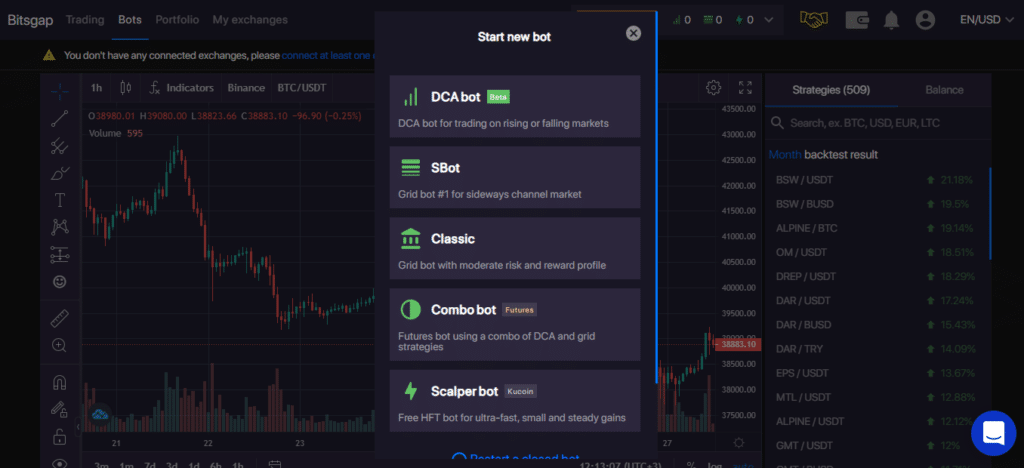
To begin this process, click on the orange “Start new bot” button at the top of the page. It will initiate a drop-down menu as below, from which you should choose the DCA bot.

Selecting the DCA bot will open a widget in which you can customize the basic settings of your new EA. Here, you will select such things as your exchange of choice, the crypto pair you intend to trade, and whether you’ll be opening a long or short position.
You will need to have funds in your connected exchange account with which you’ll be trading. The bot will typically utilize at most 95% of this balance, while the rest is left to cater for any transaction costs you may incur.
Step 2: Specifying your order size and trade conditions
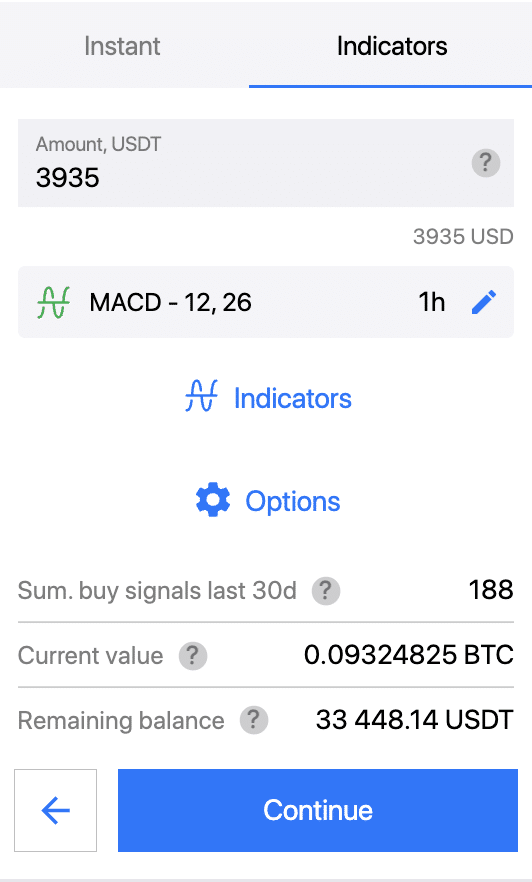
Here, you’ll key in the value of your first trade; then, you can choose whether you wish the bot to execute the trade instantly or set it to be triggered by indicator entry signals. For the instant option, your order is going to be executed as soon as you’re done setting up your bot.
For the indicator option, the bot will wait until the entry signal is produced by your indicator on the chosen timeframe. For this option, the “sum. buy signals the last 30d” will show you the number of signals your indicator yielded in the last 30 days to give you a sense of how often your bot will be entering trades based on your specifications. This will appear as below.

By clicking on the pencil icon right next to your chosen indicator, you can edit it to change to another indicator and specify its timeframe. Click confirm to apply the edits.
If you wish to add an additional indicator, click on indicators, select a new one from the drop-down menu, and set its timeframe. Click confirm to apply your changes. The “Projected sum. buy signals last 30 days” will show you the number of signals your indicator combination has yielded in the last month.
You can also add additional conditions for trade execution using the options button, such as a maximum and minimum price. This helps you avoid purchasing at the peaks and selling at the troughs.
Step 3: Customizing your DCA orders
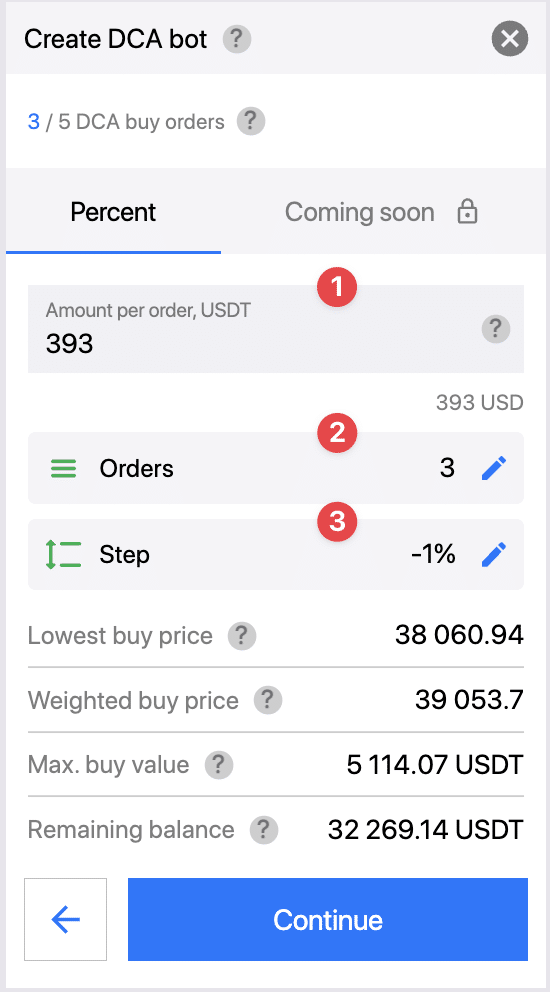
In this step, you enter specifics of your order sizes and frequency by tweaking:
- Amount per order
- Orders – the number of orders
- Step – the price difference between orders
Once these are keyed in, press continue. This will display:
- Your lowest buy/sell price
- Your weighted buy/sell price, which is the mean price of all executed orders
- Max buy/sell value, which is your total available investment value
- The remaining balance, which is the funds that remain for placing new trades

Step 4: Specifying your take profit levels
Here, you set the conditions for exiting your positions while they are in profit. You can place the profit target a percentage value away from your entry price, or you could set it to follow an exit signal from indicators.
For the percent choice, you could select the fixed option to take your gains at a fixed distance from the first order’s entry point. You could also choose the DCA option, which places the profit target relative to the volume-weighted mean of all orders.
For the indicators option, the trade is going to be closed only when the indicators you chose yield the exit signal. Using the options button, you can also instruct the bot to ignore indicator exit signals if sufficient profit has not been realized. To achieve this, click on options, followed by minimum profit, then enable. You can choose to lock in your profits relative to the DCA price (average) or fixed price (from the first order).
Step 6: Setting a stop loss
Though this is not a mandatory step, you can use it to instruct your bot to exit losing positions before they result in large losses. This has two options, Exit and stop and Exit and wait. With the latter, once the trade has been stopped, the bot waits to open a new trade once your specified conditions are met. However, this choice is only presented to you if you choose your entry signals based on indicators. For exit and stop, the bot closes your position and stops any subsequent trading.
Again, you can set your stop loss as fixed, which is based on the first order’s price, or as a DCA SL, which is based on the weighted mean price of all your orders. What’s more, using the options button, you can customize the exit and stop function by setting up a trailing stop that follows the price. For the exit and wait, you can choose a drawdown limit that limits your losses based on your open positions and accrued profits.
Step 6: Preview
In this step, you can review and confirm all your selected settings, then press confirm if they are in order. This will create your bot, which is ready to start trading.
Conclusion
The DCA strategy is one in which traders make several small purchases at regular intervals, as opposed to investing their funds into a cryptocurrency all at once. This has the benefit of reducing the risk of large losses. One can easily create a bot to execute DCA trades using platforms such as Bitsgap.


Leave a Reply